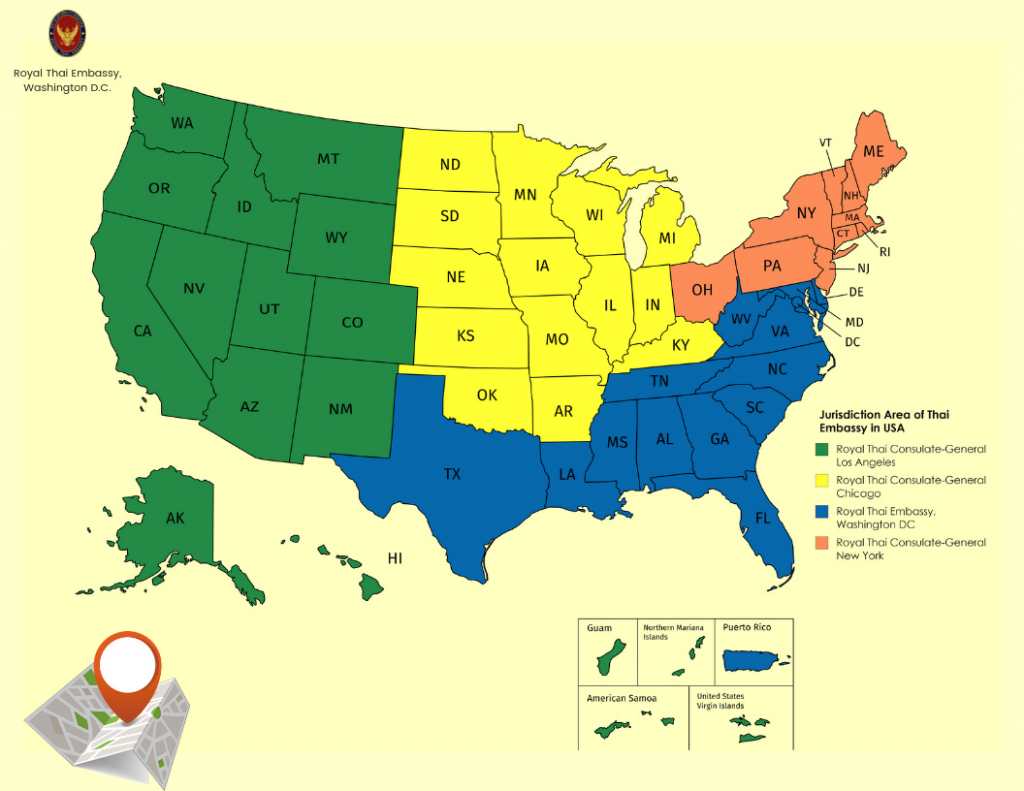
Navigating the document legalization process can be a challenging task, especially if you’re preparing to make a move or deal with legal matters in a foreign country. For those needing to legalize US documents for use in Thailand, the Royal Thai Embassy in Washington D.C. provides an essential service that facilitates this process. Understanding jurisdiction and the types of documents handled is crucial. Here’s your comprehensive guide to getting everything squared away.
Understanding Jurisdiction

Before delving into the process of legalization itself, it’s important to understand which Thai Embassy or Consulate can legalize your documents. Jurisdiction is typically based on the state where the document was issued. The Royal Thai Embassy in Washington D.C. generally handles documents that originate from states within its jurisdiction. However, always check the specific embassy’s guidelines as jurisdiction can vary, and other Thai Consulates in places like New York or Los Angeles might be relevant depending on your location.
Step-by-Step Process for Legalization
Step 1: Have Your Document Notarized
Initially, your document needs to be notarized in the US. Ensure the notary public’s certification is clearly visible.
Step 2: State-Level Authentication
After notarization, obtain a certification from the Secretary of State Office where the notary public is registered. They verify the authenticity of the notary’s signature.
Step 3: U.S. Department of State Authentication
Next, the document requires authentication by the U.S. Department of State in Washington D.C. This serves as federal recognition of your document’s validity.
Step 4: Legalization by the Royal Thai Embassy
With all US-based authentications complete, the document must then be presented to the Royal Thai Embassy for the final legalization. This step confirms the document’s authenticity and legal standing for use in Thailand.

Submitting Your Documents
Documents can typically be submitted by mail or in person, depending on the embassy’s current procedures. Always include:
- Original authenticated documents
- A photocopy of all documents to be legalized
- A self-addressed, prepaid return envelope
- Applicable fees: $15 money order or cashier’s check. Personal checks and cash will not be accepted.
Tips for a Smooth Legalization Process
> Double-Check Jurisdiction: Confirm which Royal Thai Embassy has jurisdiction over your state.
> Document Requirements: Ensure each document complies with notary and state authentication standards before submission to avoid delays.
> Plan Ahead: Legalization can be time-consuming. Start well in advance (6-8 weeks) of when you need your documents ready.
Conclusion
Legalizing documents for use in Thailand involves several steps but understanding the process can demystify and streamline your efforts. Whether it’s managing property affairs or sorting out travel permissions for minors, the Royal Thai Embassy is a crucial resource for ensuring your documents meet all legal requirements in Thailand. With careful preparation and attention to detail, you’ll be ready to navigate your affairs in Thailand with confidence.
Remember, always verify the latest procedures and requirements directly with the embassy before proceeding, as policies can change.

